Archive
Cheap Virtual Reality option
Probably you have eared about the Virtual Reality, and how companies like Oculus Rift are creating devices for that.
I am very interested on it, because it could improve a lot your gaming experience. However, I was quite disappointed about the prize (around 700 euros in Europe) and the minimum requirements to use Oculus Rift. In their web page you can download one software that will check if your computer is acceptable or not.
I started to investigate if there is a possible option to use your smartphone as a screen, I even though to develop something, but finally it was not necessary. The main issue I found is that there are people comments from the middle of 2015 and I didn’t find almost nothing from that date to nowadays (it is 23-01-2016 in the moment that I’m writing these lines).
I’m going to show you how can we play Project Cars game using our smartphone as a Virtual Reality screen and head tracker.
What software do you need
- Trinus VR. There is one server application for desktop and other for the client. Our client will be a Nexus 5 with Android 6.0.1. This application is going to redirect the image from your computer to your smartphone and it will be listening your inputs to do the head tracking. It also split the screen in two parts to provide the Virtual Reality effect when you insert your smartphone in a VR glasses.
- Opentrack 2.3. As I said, Trinus VR will be listening your inputs… but wait, what inputs?. It could be a mouse move, UDP packages incoming, etc. Theoretically, we don’t need this application, but I realized that the head tracking in Project Cars doesn’t work with Trinus VR. So I will use Opentrack to fix this problem.
- FreePIE IMU. There is no direct link to download. You will find this Android application inside the Opentrack 2.3. Instructions here. It is an APK that you will need to copy in your Android device and install it.
Physical devices
- Android smartphone that can run Trinus VR client and FreePIE IMU.
- PC that can run Project Cars and all the software mentioned with Windows 7 or higher.
- USB cable to connect your smartphone with your computer.
- (Optional) VR glasses to insert your smartphone.
Lets start
- Install all the required software.
- Plug your smartphone with USB to your PC.
- Run Project Cars in windowed mode, because it is mandatory for the Trinus VR display. Start any circuit in free practice for example and set the camera to the helmet view.
- PC: Run as an administrator, Trinus VR and Opentrack.
- Android: Run Trinus VR and FreePIE IMU, use the IP of your computer.
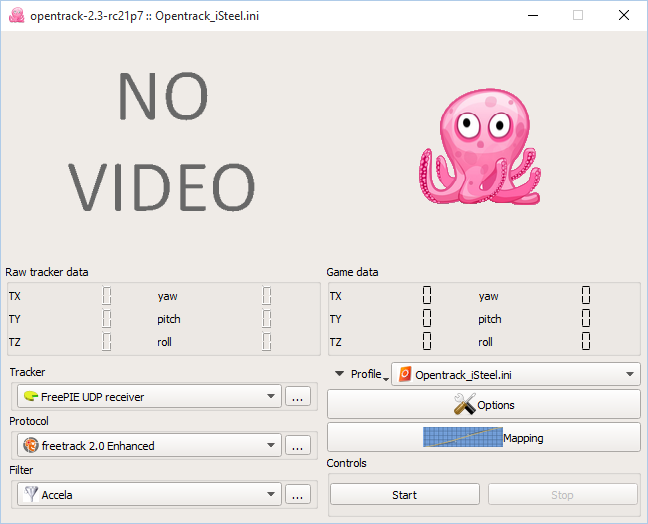
- Load the profile .ini (you will find it at the end of the post) in Opentrack and check the screenshots I attach.
- Make sure that the port value is the same as FreePIE IMU is using. Click start and if everything is fine, the octopus will move with the movement of your smartphone.
- Run Trinus VR with the configuration that you can see in the screenshots. It is important to set the Sensor output: Free Track.
At this point, you should see the game screen in your smartphone and the movements of the smartphone should be captured in the game.
One more thing. In my case, somehow Trinus VR starts to capture the inputs after clicking start in Opentrack and there is a mess because we have 2 programs setting the head track. There are two options:
- Stop the Opentrack.
- Set the sensor output in TrinusVR to no sensor.
Attachments


Profile .ini (Save this in a file with any name .ini and load it in the Opentrack as a profile)
[Curves-tx]
point-count=1
point-0-x=100
point-0-y=100
[opentrack-ui]
camera-pitch=0
camera-yaw=0
compensate-translation=true
compensate-translation-disable-z-axis=false
filter-dll=Accela
pitch-alt-axis-sign=false
pitch-invert-sign=false
pitch-source-index=4
pitch-zero-pos=0
protocol-dll=freetrack 2.0 Enhanced
roll-alt-axis-sign=false
roll-invert-sign=true
roll-source-index=5
roll-zero-pos=0
tracker-dll=FreePIE UDP receiver
tracker2-dll=
use-system-tray=false
x-alt-axis-sign=false
x-invert-sign=false
x-source-index=0
x-zero-pos=0
y-alt-axis-sign=false
y-invert-sign=false
y-source-index=1
y-zero-pos=0
yaw-alt-axis-sign=false
yaw-invert-sign=false
yaw-source-index=3
yaw-zero-pos=0
z-alt-axis-sign=false
z-invert-sign=false
z-source-index=2
z-zero-pos=0
button-center=-1
button-start-tracking=-1
button-stop-tracking=-1
button-toggle=-1
button-toggle-tracking=-1
button-zero=-1
camera-roll=0
center-at-startup=true
centering-method=1
guid-center=
guid-start-tracking=
guid-stop-tracking=
guid-toggle=
guid-toggle-tracking=
guid-zero=
keycode-center=F12
keycode-start-tracking=
keycode-stop-tracking=
keycode-toggle=
keycode-toggle-tracking=
keycode-zero=
[Curves-tx_alt]
point-count=1
point-0-x=100
point-0-y=100
[Curves-ty]
point-count=1
point-0-x=100
point-0-y=100
[Curves-ty_alt]
point-count=1
point-0-x=100
point-0-y=100
[Curves-tz]
point-count=1
point-0-x=100
point-0-y=100
[Curves-tz_alt]
point-count=1
point-0-x=100
point-0-y=100
[Curves-rx]
point-count=3
point-0-x=7.1999998092651403
point-0-y=8.7804880142211896
point-1-x=30.034286499023398
point-1-y=90.439025878906193
point-2-x=50.194286346435497
point-2-y=180
[Curves-rx_alt]
point-count=1
point-0-x=180
point-0-y=180
[Curves-ry]
point-count=3
point-0-x=6.9942855834960902
point-0-y=8.7804880142211896
point-1-x=30.034286499023398
point-1-y=91.317070007324205
point-2-x=49.7828559875488
point-2-y=180
[Curves-ry_alt]
point-count=1
point-0-x=180
point-0-y=180
[Curves-rz]
point-count=1
point-0-x=180
point-0-y=180
[Curves-rz_alt]
point-count=1
point-0-x=180
point-0-y=33.365852355957003
[Accela]
ewma=2
rotation-threshold=25
translation-threshold=25
[freepie-udp-tracker]
add-pitch-degrees=0
add-roll-degrees=0
add-yaw-degrees=0
axis-index-x=0
axis-index-y=1
axis-index-z=2
port=5555
[keyboard-shortcuts]
key-alt-center=false
key-alt-toggle=false
key-alt-zero=false
key-ctrl-center=false
key-ctrl-toggle=false
key-ctrl-zero=false
key-index-center=19
key-index-toggle=0
key-index-zero=0
key-shift-center=false
key-shift-toggle=false
key-shift-zero=false
[proto-freetrack]
use-memory-hacks=false
used-interfaces=0
[udp-proto]
ip1=127
ip2=0
ip3=0
ip4=0
port=5556
This other profile works much better for me:
[Curves-tx]
point-count=1
point-0-x=100
point-0-y=100
[opentrack-ui]
camera-pitch=0
camera-yaw=0
compensate-translation=true
compensate-translation-disable-z-axis=true
filter-dll=Accela
pitch-alt-axis-sign=false
pitch-invert-sign=true
pitch-source-index=4
pitch-zero-pos=0
protocol-dll=freetrack 2.0 Enhanced
roll-alt-axis-sign=false
roll-invert-sign=true
roll-source-index=5
roll-zero-pos=0
tracker-dll=FreePIE UDP receiver
tracker2-dll=
use-system-tray=false
x-alt-axis-sign=false
x-invert-sign=true
x-source-index=0
x-zero-pos=0
y-alt-axis-sign=false
y-invert-sign=true
y-source-index=1
y-zero-pos=0
yaw-alt-axis-sign=false
yaw-invert-sign=false
yaw-source-index=3
yaw-zero-pos=0
z-alt-axis-sign=false
z-invert-sign=true
z-source-index=2
z-zero-pos=0
button-center=-1
button-start-tracking=-1
button-stop-tracking=-1
button-toggle=-1
button-toggle-tracking=-1
button-zero=-1
camera-roll=0
center-at-startup=true
centering-method=1
guid-center=
guid-start-tracking=
guid-stop-tracking=
guid-toggle=
guid-toggle-tracking=
guid-zero=
keycode-center=F11
keycode-start-tracking=
keycode-stop-tracking=
keycode-toggle=
keycode-toggle-tracking=
keycode-zero=
[Curves-tx_alt]
point-count=1
point-0-x=100
point-0-y=100
[Curves-ty]
point-count=1
point-0-x=100
point-0-y=100
[Curves-ty_alt]
point-count=1
point-0-x=100
point-0-y=100
[Curves-tz]
point-count=1
point-0-x=100
point-0-y=100
[Curves-tz_alt]
point-count=1
point-0-x=100
point-0-y=100
[Curves-rx]
point-count=3
point-0-x=7.1999998092651403
point-0-y=8.7804880142211896
point-1-x=76
point-1-y=80
point-2-x=180
point-2-y=180
[Curves-rx_alt]
point-count=1
point-0-x=180
point-0-y=180
[Curves-ry]
point-count=3
point-0-x=6.9942855834960902
point-0-y=8.7804880142211896
point-1-x=100
point-1-y=100
point-2-x=180
point-2-y=180
[Curves-ry_alt]
point-count=1
point-0-x=180
point-0-y=180
[Curves-rz]
point-count=1
point-0-x=180
point-0-y=180
[Curves-rz_alt]
point-count=1
point-0-x=180
point-0-y=33.365852355957003
[Accela]
ewma=2
rotation-threshold=25
translation-threshold=25
[freepie-udp-tracker]
add-pitch-degrees=0
add-roll-degrees=0
add-yaw-degrees=0
axis-index-x=0
axis-index-y=1
axis-index-z=2
port=5555
[keyboard-shortcuts]
key-alt-center=false
key-alt-toggle=false
key-alt-zero=false
key-ctrl-center=false
key-ctrl-toggle=false
key-ctrl-zero=false
key-index-center=19
key-index-toggle=0
key-index-zero=0
key-shift-center=false
key-shift-toggle=false
key-shift-zero=false
[proto-freetrack]
use-memory-hacks=false
used-interfaces=0
[udp-proto]
ip1=127
ip2=0
ip3=0
ip4=0
port=5556
Playing with JerseyTest (Jersey 2.5.1 and DI)
I’m going to try explaining a trivial REST example. The idea is building a basic schema to start playing with Jersey. When I begin to use some framework, I usually develop a test enviroment for failing fast, and that is what I’m going to do.
The next example has these features:
- Jersey 2.5.1
- Dependency Injection
- JUnit for testing
Classes:
- Resource: it will attend the HTTP calls.
- Service: it’s an interface with two implementations, Impl1 and Impl2.
- ServiceProvider: it will give the apropiate implementation of Service per each request call in runtime.
- TestBinder: it set the bindings into the Resource.
import static org.junit.Assert.assertEquals;

import javax.inject.Inject;
import javax.ws.rs.GET;
import javax.ws.rs.Path;
import javax.ws.rs.PathParam;
import javax.ws.rs.core.Application;
import javax.ws.rs.core.Response;

import org.glassfish.hk2.api.Factory;
import org.glassfish.hk2.utilities.binding.AbstractBinder;
import org.glassfish.jersey.process.internal.RequestScoped;
import org.glassfish.jersey.server.ResourceConfig;
import org.glassfish.jersey.test.JerseyTest;
import org.junit.Test;

public class JerseyInjectionTest extends JerseyTest {

	private static final String EXPECTED_CONTENT = "any string :P";

	/**
	 * Checks that the Resource uses Impl1.class
	 */
	@Test
	public void invokeImpl1(){
		invoke(Impl1.class);
	}

	/**
	 * Checks that the Resource uses Impl2.class
	 */
	@Test
	public void invokeImpl2(){
		invoke(Impl2.class);
	}

	/**
	 * Checks that Resource.anyContent has always the value of EXPECTED_CONTENT
	 */
	@Test
	public void checkContent(){
		Response response = target("example/content").request().get();
		assertEquals(EXPECTED_CONTENT, response.readEntity(String.class));
	}

	private <T extends Service> void invoke(Class<T> service){
		final String serviceName = service.getName();
		Response response = target("example/"+serviceName).request().get();
		assertEquals(service.getName(), response.readEntity(String.class));
	}

	/**
	 * Register the Resource and TestBinder in the Application
	 */
	@Override
	protected Application configure() {
		return new ResourceConfig() {
			{
				register(new TestBinder());
				register(Resource.class);
			}
		};
	}

	@Path("/example")
	public static class Resource {

		@Inject
		Service service;
		@Inject
		String anyContent;

		/**
		 * Returns the name of the Service's implementation
		 */
		@GET
		@Path("/{serviceClass}")
		public Response getDynamicInvokedService() {
			return Response.ok(service.getClass().getName()).build();
		}

		/**
		 * Returns always the value of anyContent
		 */
		@GET
		@Path("/content")
		public Response getStaticContent() {
			return Response.ok(anyContent).build();
		}

	}

	/**
	 * This class will help Resource to set the @Inject fields.
	 */
	public static class TestBinder extends AbstractBinder{

		@Override
		protected void configure() {
			bindFactory(ServiceProvider.class).to(Service.class);
			bind(EXPECTED_CONTENT).to(String.class);
		}

	}

	/**
	 * This class will instance a Services's implementation
	 * per each time that the Resource is called.
	 */
	@RequestScoped
	public static class ServiceProvider implements Factory<Service> {

		private final String serviceName;

		public ServiceProvider(@PathParam("serviceClass") String serviceName) {
			this.serviceName = serviceName;
		}

		@Override
		public void dispose(Service arg0) {}

		@Override
		public Service provide() {
			try {
				return (Service) Class.forName(serviceName).newInstance();
			} catch (Exception e) {
				return null;
			}
		}

	}

	/**
	 * Dummy services
	 */
	public static interface Service {}
	public static class Impl1 implements Service {}
	public static class Impl2 implements Service {}

}
Now we can try new features easily.
I hope that helps.
Actualizar a JDK7 en Linux sin romper /etc/alternatives
Como seguramente ya sabéis, debido a temas relacionados con licencias, el JDK7 de Sun (digo, Oracle) no estará incluido en los repositorios de Debian o Ubuntu. Esto no quiere decir que no se pueda instalar JDK7 en Linux, ya que puede descargarse de Sun en forma de .tgz e instalarlo.
Normalmente la instalación de los JDK se realizaba mediante el correspondiente paquete .deb. Dichos paquetes, además de instalar el JDK en sí, realizaban otra serie de operaciones, entre las que se encuentran actualizar ciertos componentes del sistema. Entre dichos componentes se encuentra /etc/alternatives, que consiste en el mantenimiento de una serie de enlaces simbólicos que permiten, en este caso, usar las herramientas del nuevo JDK sin tener que modificar los ejecutables o paths ya configurados en otras aplicaciones.
Sin embargo, al no instalarse el nuevo JDK como un paquete .deb, tendremos que actualizar el sistema /etc/alternatives a mano.
En primer lugar, veamos el estado actual del sistema:
yo@localhost:~$ update-alternatives --list java
/usr/lib/jvm/java-6-openjdk/jre/bin/java
/usr/lib/jvm/java-6-sun/jre/bin/java
En este caso vemos las alternativas para el comando java, que consisten en la proporcionada por OpenJDK y la máquina de Sun en su versión 6. Sin embargo, el JDK no es sólo java, contiene una completa serie de utilidades. Sin ir mas lejos, para compilar, necesitaremos javac. Veamos:
yo@localhost:~$ update-alternatives --list javac
/usr/lib/jvm/java-6-openjdk/bin/javac
/usr/lib/jvm/java-6-sun/bin/javac
Además podemos ver cuál es la versión que se usará por defecto. Por ejemplo, para javac obtenemos:
yo@localhost:~$ update-alternatives --display javac
javac - modo manual
el enlace apunta actualmente a /usr/lib/jvm/java-6-sun/bin/javac
/usr/lib/jvm/java-6-openjdk/bin/javac - prioridad 1061
esclavo javac.1.gz: /usr/lib/jvm/java-6-openjdk/man/man1/javac.1.gz
/usr/lib/jvm/java-6-sun/bin/javac - prioridad 1062
esclavo javac.1.gz: /usr/lib/jvm/java-6-sun/man/man1/javac.1.gz
Actualmente la «mejor» versión es /usr/lib/jvm/java-6-sun/bin/java.
La salida indica que el javac por defecto es el que nos proporciona el JDK6.
Como es de esperar, el sistema /etc/alternatives proporciona un interfaz para añadir nuevas alternativas. Sin embargo, un paquete como los JDK requiere actualizar muchas “alternativas” y sus “esclavas” de páginas de documentación.
Para actualizar varias máquinas, o si no quieres complicarte la vida usando /etc/alternatives directamente, puedes usar el script que proporcionamos a continuación. Se le pasa como parámetro el directorio donde has instalado el JDK7 (sin la / del final, es un poco tosco, la verdad) y genera un archivo update-alternatives, para añadir las nuevas opciones, y otro set-alternative, que las pone como valor por defecto. Echando un vistazo a estos archivos puedes hacerte una idea de la cantidad de “alternativas” que se actualizarán.
Después de ejecutarlo tu sistema debería haberse actualizado de la siguiente manera:
yo@localhost:~$ update-alternatives --list javac
/usr/lib/jvm/java-6-openjdk/bin/javac
/usr/lib/jvm/java-6-sun/bin/javac
/usr/lib/jvm/jdk1.7.0_03/bin/javac

yo@localhost:~$ update-alternatives --display javac
javac - modo manual
el enlace apunta actualmente a /usr/lib/jvm/jdk1.7.0_03/bin/javac
/usr/lib/jvm/java-6-openjdk/bin/javac - prioridad 1061
esclavo javac.1.gz: /usr/lib/jvm/java-6-openjdk/man/man1/javac.1.gz
/usr/lib/jvm/java-6-sun/bin/javac - prioridad 1062
esclavo javac.1.gz: /usr/lib/jvm/java-6-sun/man/man1/javac.1.gz
/usr/lib/jvm/jdk1.7.0_03/bin/javac - prioridad 1063
esclavo javac.1: /usr/lib/jvm/jdk1.7.0_03/man/man1/javac.1
Actualmente la «mejor» versión es /usr/lib/jvm/jdk1.7.0_03/bin/javac.
Sin mas dilación, el script. Ni que decir tiene que, como es habitual, si lo usas es por tu cuenta y riesgo, etc… En definitiva, que no nos culpes si algo sale mal 😉
#!/bin/bash

NEWDIR=$1; # without final slash please !!
LATEST=$((`update-alternatives --query java|grep Priority:|awk '{print $2}'|sort -n|tail -1`+1));

echo "Adding JDK from $1 with priority $LATEST";

BASH_FILE="update-alternatives";
UPDATE_FILE="set-alternative";

echo "#!/bin/bash" > $BASH_FILE;
echo "####" >> $BASH_FILE;
echo "####" >> $BASH_FILE;

echo "#!/bin/bash" > $UPDATE_FILE;
echo "####" >> $UPDATE_FILE;
echo "####" >> $UPDATE_FILE;
# man update-alternatives
# update-alternatives --install link name path priority [--slave link name path]...

for f in /etc/alternatives/*
do
fname=`echo $f | awk -F'/' '{print $4}' `;

CMD="update-alternatives --install /usr/bin/";
BIN="bin/$fname";
MAN="man/man1/${fname}.1";
MANGZ="man/man1/${fname}.1.gz";

if [ -f $NEWDIR/$BIN ] ; then
echo "# Adding $fname" >> $BASH_FILE;
CMD="${CMD}${fname} ${fname} $NEWDIR/$BIN $LATEST ";

echo "update-alternatives --set ${fname} $NEWDIR/$BIN">> $UPDATE_FILE;

if [ -f $NEWDIR/$MAN ] ; then
echo "# Adding slave ${fname}.1" >> $BASH_FILE;
CMD="${CMD} --slave /usr/share/$MAN ${fname}.1 $NEWDIR/$MAN";
fi

if [ -f $NEWDIR/$MANGZ ] ; then
echo "# Adding slave ${fname}.1.gz" >> $BASH_FILE;
CMD="${CMD} --slave /usr/share/$MANGZ ${fname}.1.gz $NEWDIR/$MANGZ";
fi
echo "$CMD" >> $BASH_FILE;
fi
done

exit;
